Tuesday, September 9, 2025

Cool way to teach C, C++ or Python with online debug and memory visualization

    This all started when I was trying to teach basics of C and Functions to a school kid. I was actually searching for a quick  online debugger for C/C++ so that I can show the program flow to the kid and explain how the program flow works through the function calls. This is when I found the website https://pythontutor.com/. Dont let the site name discourage you its not limited to python, the site actually support debug of C, C++, Python, JavaScript, Java code.

    Not only this website gives some sample programs to see execution and memory visualization but we can also input our own programs in the site and execute them step by step to teach the new comers how exactly program flow and variable storage works. It also works good with pointers and show proper visualization of pointers and its values etc. Well they say a picture speaks a thousand words so I will share a screenshot from the website now.


    I liked the way it showed the character array in visual to demonstrate how it would be stored in the memory. This site also has experimental feature of AI Tutor where you can ask question about the code and AI Tutor will try to explain the code.


The AI Tutor gives the explanation of code line by line or with key take away etc. When I selected "Teach me about a key concept that this code demonstrates" I saw following type of result...


This is quiet good from the perspective of teaching a new comer. So overall I liked this idea implemented by the website pythontutor.com very much. It helps a lot to teach programming to new comer kids.

Thursday, December 21, 2023

Malware Analysis Researchers do Add VirusTotal as search engine in Chrome and save time

Why to add VirusTotal.com as custom search engine ?

 While conducting an analysis of a malware family, I found it has become my routine to open an extensive number of tabs on the online malware scanning platform, VirusTotal.com. However, I find it rather time-consuming to repeatedly navigate to VirusTotal, wait for the main page to load, and then search for the hash. The address bar in Google Chrome can serve as a convenient tool for conducting rapid searches. During my investigation, I delved into the possibility of utilizing VirusTotal as a search engine. The current configuration of the search engine list within the Chrome browser is inherently restricted to exclusively encompass some of  the web search engines. Below, I will outline the necessary steps to incorporate VirusTotal.com into the default search engine list within the Chrome browser. This will enable you to efficiently search for content on VirusTotal.com.


Steps to Add VirusTotal.com as Search Engine

Here are steps to add custom search engine which will search query in VirusTotal.com.

1. Open Google Chrome Browser

2. Click on three vertical dots in right hand top corner (below the close / maximize buttons)


3. On settings page click on Search engine, then click on Manage Search engines and site search, you can also type chrome://settings/searchEngines in search bar to reach to this page.


4. Scroll down to find Site Search section and click on the Add button.


5. Fill in the three fields in the Add search engine pop-up box as shown below and then click Add button
  • Search engine: VirusTotal
  • Shortcut : You can use any shortcut, I am using shortcut:  vt
  • URL:  This would be the search URL from VirusTotal.com with added %s which will be get replaced by the query text that user enters. So add following URL in the inputbox: https://www.virustotal.com/gui/search/%s

6. To search a any query or hash in Virustotal follow these steps
  • Type the shortcut in Chrome address bar
  • Press space or tab
  • Enter the hash or virustotal query in the address bar


  • Press Enter to search
  • You will be see virustotal.com search results


7. This is not just limited to VirusTotal.com you can use this for any site that has search box.

Thursday, September 1, 2016

How to trace python daemon program

Well some of you might think whats there to trace in a python program simply use pdb.
Oh if you dont know pdb debugging you ought to read whole full post, if you know about pdb I will describe other method which worked for demonized + threads code from fourth paragraph.

    So I was helping a friend to debug a code to find data flow. The code was running as demon making it difficult to debug. The module consisted multiple files and main file being around 2000 lines of code. So I first went to my favorite option pdb.

 import pdb
 pdb.set_trace()

Normally if you put these two line in any normal python code then you will get a interactive shell and execution will stop at that line and wait for your commands. Then you can just enter command like 'n' to execute n(ext) line, or s(tep) to step into functions. You can use command  w(here) to print a stack trace to check where is the current execution line and nearby code. If you are interested in details of the pdb basics checkout the article at https://pymotw.com/2/pdb/ or https://docs.python.org/2/library/pdb.html Since code was running as daemon and running threads it was difficult to interact with pdb. The pdb shell was just getting printed somewhere on the command line and was not possible to interact with it. So I went ahead to check other options how trace the function calls of these program.

    I found a other option of  sys.settrace() to see which function of the program are being called in which order. The sys.settrace() needs a function to be written to handle the callback. So here is a function code which I got from internet and updated to my needs:

def trace_calls(frame, event, arg):
    if event != 'call':
        return

    co = frame.f_code
    if co is not None:
        func_name = co.co_name
        if func_name in ['write',' __getattr__']:
            # Ignore write() calls from print statements
            return
        line_no = frame.f_lineno
        filename = co.co_filename
        #only output function names from module dir
        if 'mymodule' not in filename:
            return

        str1 = 'Call to %s on line %s of %s \n Args:%s\n' % (func_name, line_no, filename,str(arg))
        print (str1)

        if func_name in TRACE_INTO:
            # Trace into this function
            return trace_lines
            
        return

I will explain somethings from this code that I changed/added to make it more simple for me. First of all There were multiple calls to multiple imported libraries. So easily the file size went to 28-30 MB. Then I put this if condition:

if 'mymodule' not in filename:


So now only function calls from 'mymodule' will be printed. Now the printed statements became less. The code prints line number from which function name was called and the file path to which the function belongs. The sys.settrace() function needs to be called and this function takes parameter function name (in our case trace_calls) which will be called when a function call happens.

sys.settrace(trace_calls)

The trace_calls function will print the information about function call as describe before.
So then I went through the multiple function calls and got the whole data flow and where to make changes to alter the data.

You might have notice one more function call trace_lines in the trace_calls function.

TRACE_INTO=['dataReceived']
def trace_lines(frame, event, arg):
    if event != 'line':
        return

    co = frame.f_code
    if co is not None:
        func_name = co.co_name
        line_no = frame.f_lineno
        filename = co.co_filename
        str1 = '  %s line %s' % (func_name, line_no)
        print (str1)

This trace line function can be called if you want to trace the execution line by line inside any function. Here a list TRACE_INTO is created and only functions in side this list will be traced as line by line. So if you feel any function is important and need to check execution you can use this functionality.

Wednesday, April 8, 2015

UPDATED python script to download files via google search V2.2

I was using my old script to download some pdf files automatically via searching in google but it seems that google has changed its format of giving search URL. So again modified the script and currently working script as of 09-April-2015

You can download the new updated script HERE

Friday, December 12, 2014

RTL-SDR with SDR# Setup

When I was reluctant to post such basic post my friend forced me to write this article saying "people love basics articles also. Which you think would be known to all." So here goes nothing

1) What is RTL-SDR

If you know about RTL-SDR Skip to 3rd point directly.

RTL - Realtek
SDR - Software Defined Radio


2) History and Discovery of RTLSDR (Source)

It turns out that Antti Palosaari is perhaps not entirely responsible alone in getting credit for the discovery of Realtek 2832U tuners being used for SDR. The RTL2382U parts were always intended by design for SDR as the dongles come with closed SDR software in Windows for DAB+ and FM reception on the mini CD. I think the credit for uncovering of what the Windows software does lies with a fellow named Eric Fry originally sniffing the USB packets from the Windows application in FM and DAB mode way back in March of 2010. He had hoped to get a DAB+ or FM receiver working in Linux (he had originally been providing unofficial support for Linux and this Quad Realtek DVB tuner). Eric and I discussed this privately at length and I made some reflections about this SDR feature in 2011 on the linux-tv mailing lists and discussed SDR potential on the associated #linux-tv IRC channel. Realtek had sent me some alpha FM SDR software for Linux with a promise of DAB+ to come. Antti's infamous email followed in early 2012. Very quickly the Realtek RTL2382U Linux driver and and some independent work by Osmocom (who were making their own E4000 based SDR) collided and in RTL-SDR as we know it exploded onto the scene.

So, the original 'discovery' lies with Eric. Much of the work getting the RTL2382U and it's associated tuners tamed in between then and now lies with Antti and Osmocom.

3) On Windows You Say ?

Yes, I know lots of people keep talking about RTL-SDR on linux and all gnu-Radio and other softwares. But wait I found some great softwares on windows also for RTL-SDR. So why not share those. I will also write something about linux setups in some later post. I had got my first RTL-SDR Dongle from dx.com (Exact model)


I opened Kali and wanted it working and listen something. But at first gnu-radio gave me some trouble getting started with basic FM also. So in hurry to listen something on dongle booted a windows machine. To my surprise there were lots of program available in windows also for the SDR. Some of them supported RTL-SDR via dierect USB some supported via a TCPIP bridge for RTLSDR. The best one I would dare say would be SDR# or SDRsharp. This is very cool software for SDR written in C# by Youssef Touil which directly detects RTLSDR from USB and can use it directly without any bridge. SDR# is free software and can be downloaded from HERE
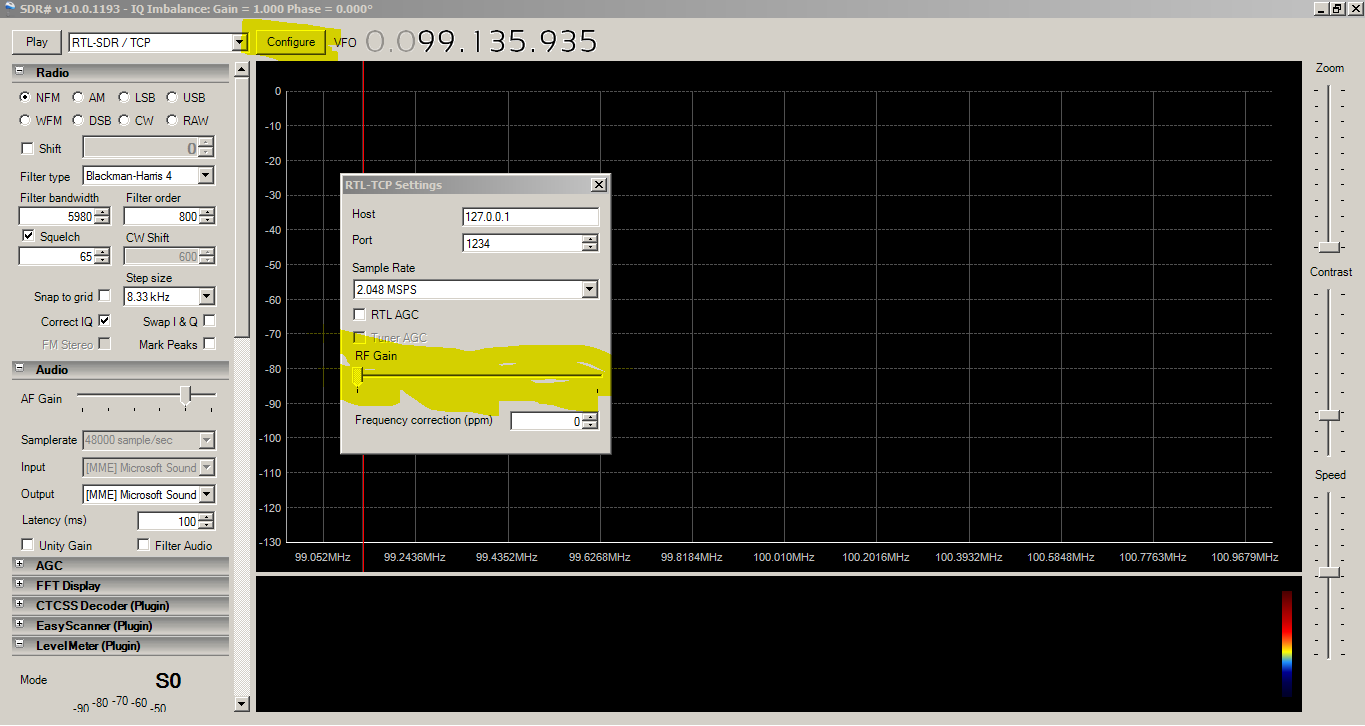
  So I downloaded SDR# plugged in my RTLSDR usb dongle and I was good to go. Oh ya one glitch I forgot to tell about the RF gain. Which is simple thing but no one tells you about. My dongle didnt started reception on first go I couldnt get anything not even Local FM radio stations in my town. So digged little bit around. I went to the official IRC channel of SDR# which is #sdrsharp on freenode . There after asking questions for some time some one asked me about RF gain settings. So when you starting your first run with RTLSDR and SDR# first thing to be done use configure button near the device dropdown.  Choose NFM in band and open configure window then start with less gain and turn it higher till you start hearing FM channel at your known frequency. You can directly enter frequency on the right hand side area of the configure button.


Once you have set RF Gain for you RTLSDR USB you are good to go. SDR# is very easy to use software. I already told you about setting frequency. It has lots of good plugins also which one can download at their website. One of the most needed module I would say is Frequency Manager. I think author has added that module to the default set of modules which comes with software. If you have not got it by default download it from author site. Frequency Manager Allows you to store and tune again to the stored frequencies. You dont want to forget where you had listened some important channel do you ?


For tuning to frequency one can click on the right hand side black pane. You can also use arrow keys to control frequency tuning. To choose desired band one can just select the band radio button.

  So this is basics about starting RTLSDR dongle in windows with SDR#. Do comment on any questions you have about it.

Wednesday, October 1, 2014

Clearing some doubts about lock picking gun

Well I had ordered my first lock picking kit months ago which was this
But this was lying around from lots of months and I had not touched it out of my laziness.
I had also ordered this lock picking gun

This was also lying around and not used ... Ya ya ya I know I am pretty lazy.

So what happened was at one meet with my fellow hackers at Garage4hackers.com, the topic was lockpicking. A hacker friend of mine had bring his lock picking tools and practice locks. So he just gave a brief into to lock picking and showed how to open some of his practice locks. I had also taken my tools and gun to show him. But he was not much fond of picking guns. But I had seen some videos of this gun picking up locks easily. There were lots of discussions and practice regarding guns but. Today I am gonna stick to only some points about this lock picking gun.
  Basically my friend said that what the gun will work similar to rake. If you dont know what is recking watch this 4 minute video to understand idea. I am not gonna discuss about lock picking techniques in this blog-post.


So since I was not sure about the lock picking gun. I made some search on net read some books/ saw some videos/ and then what I found was actually this gun was not doing anything in the line of picking with rake.
   This kind of manual gun does picking on the principle of bump keying. Check out this basic info about bump keying if you are not aware about it. Again I am not covering bump keying in details in this blog post.


So if you see the basic videos of this manual locking picking gun working in the field. It gets clear that it does not try to rake the keys but tries to bump the keys. (Push all keys at a time with the help of vibration created by gun)


So it makes clear that this kind of manual gun works on the principle of key bumping. Well a lot of pros would be already knowing this but since I am beginner in the lock picking area it was news for me. So I thought I would write down on my blog so it might help some other new comer of lock picking.
  Well I also tried out the gun with the practice lock that I had brought.


 Well it was little bit difficult that the lock on my drawer. Since it was having spring action which was snap opening lock.


I had opened both locks with the picking tools. So I went on trying the gun on these locks today. So on the both locks it worked quiet well. So as newbie in to lock picking I was very happy with my work. I shall keep posting further lesson I get into lock picking in the future (Possibly if not feeling lazy).

Wednesday, August 13, 2014

7 things about embedded/electronics projects that you might have mistaken

Well I have not invested lots of years into embedded electronics. I was electronic enthusiastic but never done much into microcontroller and embedded stuff before 2011. By the end of 2011, I had ordered my Teensy (atmega based circuit with built in USB programmer interface). I had ordered Teensy basically to try USB based attack vectors by programming teensy as USB keyboard and trying to create a batch file on the victim computer and run it etc. Some good tools and frameworks have been written about the use of Teensy like devices as attack vector. (E.g. https://code.google.com/p/kautilya/ by @nikhil_mitt) So I am not going into details of embedded device as attack vector on computers.

 I had done some small projects using this Teensy like Remote Controlling PC via TV Remote. But I started programming of Atmega Chips (microcontroller) due to an incidence. My nephew had done some robotics class where they had taught (really?) them about atmega16 based line follower robot. Also gave each one a piece of hardware. But my nephew was given a further difficult challenge to complete on his own… To solve a maze. But neither my nephew nor other friends in class were able to complete task. They were not able to re-produce normal line following ability of robot at home. So my nephew called me expressed his problem. So, first I gave him general idea how the code should work. Then sent a partial code to help him but he couldn’t do it. So I and a friend of mine took this challenge. I was sure that it should work but we needed to get information about coding and sensor as well as prepare algorithm of the robot. So we started collecting datasheets and information about the tools and coding softwares etc. Within 8-10 days we were able to run the robot perfectly as per the requirements of the challenge. Reason telling you this story is embedded device is not that hard as you think. The person who knows any one programming language can easily use embedded device. That’s why I thought to write about 7 things you never knew were easy about Embedded Hardware devices projects.

1)      Embedded Hardware is not as difficult as you think!
2)      You don’t need to do soldering!
3)      You don’t need low level language like Assembly!
4)      It’s not as expensive as you think
5)      Simulators are your best friends!
6)      Don’t be afraid of PCB designing!

7)      Manufacturing like a pro

Embedded Hardware is not as difficult as you think!

I have been arranging Hardware training trying to get people involved into hardware hacking projects. But I have seen lots of people having the fear of hardware or embedded projects as if touching any microcontroller will give them -A.C. 240V electric current. Very less number of people were interested in the trainings even if some were free of cost. It is not as difficult as people think. I am telling this from my own experience. I had started programming with a line follower robot without any previous knowledge about these microcontrollers then also I had succeeded in completing the challenge of solving maze using line follower robot. If I can do it so do you can do it too isn’t it? This is not rocket science though people have created rockets using thisJ . Just see at some sample codes get some basic compliers or programming IDE for microcontrollers and start with simple codes. Most of the microchips would allow you to code in C or C++ language.

You don’t need to do soldering!

I have also seen people saying oh electronics you need wires you need to do soldering. I can’t user soldering gun etc. But hey you are in to new era of electronics and embedded devices. Lots of microcontroller devices come with the basic development kits readymade. Some times by the device manufacturers or sometimes by some local vendors.
For Ex. Atmega8 Development kit


You just need to plug-in cables and you can use these boards for GPIO (General Purpose Input Output). Some of these boards have basic input as switches and out puts as LED or Buzzer etc. So even if you don’t know soldering and you never have built electronics circuits… don’t be afraid.

You don’t need low level language like Assembly!

            One more reason people put forward for not doing embedded projects is they don’t know low level language like Assembly and they don’t want to take the trouble to learn assembly language. Wake up people. Almost all generally used Microcontrollers give us option to code in to higher level language such as C / C++. Most popular open-source hardware platform Ardiuno uses C++ as its base language in its IDE. Other major share or chips from Atmel use C or C++ both and also come with full visual studio based development environment.


It’s not as expensive as you think

            Normally we use most of the free software. So to start embedded project people are not ready to spend cash. But we don’t need lots of cash to start a microcontroller project. Lots of time a development kit could be brought for around 10$ to 20$ (600 to 1200 INR). So to start off you don’t need all big gadgets and don’t need to empty your pocketsJ. After starting some small projects you can check if you are embedded into it and want to spend more on it or not.

Simulators are your best friends!

            If you want to check circuits or microcontrollers without assembling any circuits then it is also possible. There are very good software simulators available these days which not only simulate most of the electronics circuits but lots of microcontrollers also. The normal hardware development cycle consist of following stages
Schematic Design -> PCB Layout –(wait for pcb)--> Physical Prototype -> Software development  --> System Testing

Instead of wasting time in more tedious development cycle system simulation can be used to do development in a rapid way.

There are free simulators like Simulator in Atmel Studio. There are some good professional quality simulators like Proteus (from http://www.labcenter.com/). 


Using simulator helps for quicker development of the electronics or embedded project.

Don’t afraid of PCB designing!

            In the old days the PCB designing used to be done via laborious manual processes. But PCB designing softwares have changed that a lot. There are some great PCB design software both Free (List of Free PCB design softwares) and Commercial (Like Proteus).


 Eagle (http://www.cadsoftusa.com/download-eagle/freeware/) is also one more free software which is pretty good for designing PCBs they have their commercial version for more than 2 layered PCB. We can do circuit design and convert it to a PCB design in some professional software like Proteus. Some other PCB designing software are also good for quickly creating PCB designs and generating manufacturing files for PCB manufacturer.
            

Manufacturing like pros.

As well as PCB designing the manufacturing of PCB has also became easy. There are lots of online services where you can design and order a PCB online.
For ex.
http://www.pcbpower.com/ - Indian website with Global reach of customers
http://www.pad2pad.com/ - They have their own software using which one can design a PCB and order directly online for manufacturing.
            http://www.leiton.de/en-index.html - Cheap rates
There are a lot other websites (Just google for “order PCB online”!) you can choose the one suitable for your need or a local one PCB manufacturer nearby you.
For assembly of the electronic circuits also, there are lots of online services available (like screamingcircuits or 7pcbassembly) but I found that the online services for the assembly of circuit are much more costly. Better option is to check for a local vendor who is doing assembly. Local vendors I found near-by give rate of around 0.004086$ which is like a quarter of 1 INR per soldering point. So I recommend to check for some local vendor rather than wasting too much money on online services of assembling circuits.
Always keep in mind that the PCB manufacturers and Assembly service providers would normally don’t give your order on time. So always keep good buffer time while giving order or bulk quantities to these vendors.

Conclusion

So get your feet wet in the fields of electronics (in electronic fluid) and embedded devices and you will find it good as hobby or business also.


Saturday, August 9, 2014

Garage4Hackers Ranchoddas Webcast on XSS Protection Bypass By Ashar Javed

Great talk about XSS filter bypass in the Ranchoddas Webcast by Garage4hackers.com


Thursday, November 14, 2013

Python Android Script copy photos from Whats App Profiles

I think everybody reading this must be using WhatsApp by now. :-D
I am amazed by how much ignorance people have. I have been told by many people that it is secure to share profile photo on WhatsApp since the application doesnt allow to save other people profile photos. Well when I saw my one friend dying to get his friend's profile photos over whatsapp (offcourse it was a girl, Haaa hahaa.) I just checked the whats app folder location and showed him that the profile photos are temporary saved in this folder. For his phone it was "/storage/sdcard0/WhatsApp/Profile Pictures" path.
 Then one more issue came forward WhatsApp deletes the profile photos automatically after some couple of days. (No I didnt bothered to find out after how much time).
        So I told him to copy the files to other folder using some file manager. But as always I was thinking of automation in my mind. So I wrote a python script which can be run by using qpython for android (http://qpython.com/). This script copies the files in the default directory of WhatsApp to user specified directory. (You will have to specify the directory in the python script, its easy this way in Android instead of going for command line and etc.
      So again one small problem was there. Every time the WhatsApp profile photo is changes it is stored by using the mobile number as filename. So by default if you copy files it would overwrite them. So you cannot use filenames to identify if the file different from existing photo in the bkp directory. So I used the md5 library in python to check the md5 sum of the files in the backup directory and tally it with same phone number file in the WhatsApp directory. So now the script copies the filename and count the files with similar name in the backup directory and paste with the one added counter name.
E.g. +919887766554-0.jpg , +919887766554-1.jpg , +919887766554-2.jpg etc.

So there you go my friend. (and any one else who needed similar script)
Steps to use
1) Install qpython on your android phone from http://qpython.com/
2) download file WatsAppCp.py from  https://sites.google.com/site/neo1981/files/WatsAppCp.py?attredirects=0&d=1
3) copy file to the scripts directory of qpython.
4) Edit the file and pur your phones path to the WhatsApp profile pictures
--  Change following variables in py file
--- mysrc = "/storage/sdcard0/WhatsApp/Profile Pictures"
--- mydst = "/storage/sdcard0/.Wats App profile BKP"
--Here mysrc is the WhatsApp profile pictures folder
--and mydst is bkp folder which you can specify

5) Run the WatsAppCp.py file from qpython
6) File whill show copying message for every photo which is copied.


Thursday, March 14, 2013

Bitdefender 2012 review II - Bad sales/support also

You might be aware that last year I had done a quick review of the Bitdeffender.
I hadn't give it good rating at that time.
But it seems only technical problems were not enough they also have bad sales/support.

One of my friend had purchased Bitdeffender 2012 Antivirus and he was trying it on Windows 8 but it seems it is not designed to be work with Windows8. But what happened afterwards is more problematic in terms of support. My friend tried to contact customer care service and trying to get this issue resolved. The customer care executive told him to download Bitdeffender windows 8 version and told same serial would work with it. But it was utter lie. The customer care executive doesn't seem to be knowing their own licencing system. Well now it has been more than two weeks my friend tried to get this issue resolved. The in-country distributor also not helping and says to contact Bitdeffender online support.
My Poor friend is all frustrated.
So it seems not only technical issues with the Bitdeffender but also sales and support problems are persistent.

Thursday, October 11, 2012

python script to download files via google search Ver. 2

Well some one suggested a feature in python download script and today I was in a mood to do little bit coding so changed the script in incarporate a new option.

--num number_of_files_to_download

If given this option script will stop after the number of files given .

you can download new version 2  HERE

Sunday, March 4, 2012

Bitdefender Total Security 2012 Review – I) Installation

Well you might be surprised and ask why I am doing a Security Product review suddenly? So before you ask let me tell … I had been contacted by Bitdefender and asked if I wanna write a review on their product Bitdefender 2012 Security Suit. I have used lots of other Antivirus and Software Firewalls but I had not used Bitdefender, I thought ok I will give it a shot on one Testing windows PC to see how it works.

Surprisingly when I registered one License key from Bitdefender, They were generous to provide me with 5 more keys to give to my friends. Well those keys are already distributed to friends so don’t ask me for a key :-)

Since I am too lazy to write the whole review at a time I thought to do it in pieces. So I will start with installation process of this and in later part I will cover other aspects of this suit.

I have made signs as bellow
-ve point = Negative Point (Whatever I did not like)
+ve point = Positive Point (I liked this)

This was the system config of the machine where I installed Bitdefender 2012 Total Security suit


The Installation:

1) No offline Installer (-ve point)

First point I noticed about the setup that it was completely online installer. Either there is no offline install or I am not able to found the offline installer for Bitdefender 2012 Security Suit. Well this is a negative point in my opinion. I had given a of Bitdefender to one of friend who’s PC was infected by some virus and he didn’t wanted the PC do be connected to Internet. But since no offline installer was found he didn’t installed Bitdefender Suit on his PC. L

2) Check conflicting products (+ve point)

Check for Other security product that might conflict with Bitdefender and runs uninstaller for those products. In my case I had Zonealarm and Avast Antivirus on the test machine. Bitdefender installed automatically run the uninstaller for both the conflicting products.

3) All products not uninstalled at one go (-ve point)

Only glitch in this I found that after uninstalling one product it only gives reboot or stop installation. It didn’t give option to uninstall all products at once and have only single reboot.

4) Not all conflicting products were uninstalled automatically (-ve point):

The Zonealarm Firewall was uninstalled properly via the Bitdefender setup, but some how it was not able to uninstall the Avast Antivirus which was present on the system. There was some error and at the time of removal of avast and PC got hanged. I don’t say it is bitdefender problem , it might be a M$ problem. I had to manually remove Avast Antivirus after reboot so the Bitdefender setup could continue.

5) First Uninstall other product then download setup: (-ve point)

According to my opinion this is a bad strategy to uninstall all the other antivirus and firewall first and then start downloading the setup files needed for continue setup. So if I get some problems downloading setup files (which I got when I was installing) then my PC is online without security products which I don’t like. I think the setup should download the files needed first then go for uninstallation of the other security products.

6) Download slow and problems continuation: (-ve point)

Bitdefnder download too Sooooo long, I went to sleep while it was downloading. On a normally 25 KB/s test connection Bitdefender setup was showing only around 10 KB/s


First I thought it was network trouble but when I started a normal download it was getting around 24KB/s


And I have tested it on multiple computer over multiple internet connections download speed of the installers seems to be a persistent issue. One other location where I installed it on the friends laptop the internet was getting disconnected quiet often. On that machine for hours I was trying to complete the installation.

7) Unable to copy or Save Licensing terms and conditions: (-ve point)

The Licensing terms and conditions is not allowing to save or copy the terms and condition that the user is agreeing to.


8) Too much time taken for first system scan (-ve point):

I have used lots of Antivirus for Bitdefender has taken most time to install on to the system. After its download has finished the setup was showing it is scanning system files for virus.


The system file scan started at 10:40 PM. It didn’t showed any progress till some minutes. I left the PC and gone to do some other work. I came back to PC after around 25 minutes and still it was not showing any progress on the progress bar.


For PC with good configuration as given in the start, I don’t think it should take that much amount of time to scan the system files.

It was around 11:20 PM and the progress bar still didn’t showed any kind of progress. L

So I was getting irritated and decided to go for sleep and do the installation some other day when I had time. But I decided to let the setup run but I didn’t know how much exact time it took to complete the setup. But at least it was completed when woke up the next morning


I will do some other tests on this suit and write about it in some days.

Do left your comments on your experience of Bitdefender if you have used it.


Saturday, January 14, 2012

python script to download files via google search

Just now some one was asking to me on chat if there is some script which can download the files if given a google search query.

When thinking I suddenly remember that I had coded such a script some time ago using xgoogle libray of python. So I just searched for my script and here it is.

As you know I am lazy, I have used xgoogle and not directly handle google via httplib or urllib etc etc. My script used getopt library to parse the options given to the script. (again I am lazy)
(xgoogle library can be downloaded at http://www.catonmat.net/blog/python-library-for-google-search/)

The general syntax of this script is

python gsrchDwn.py --query "query_text" [--ftype file_extension] [--cnt contine_result_number] [--dir download_dir]

usage: python gsrchDwn.py --query maths made easy --ftype pdf

IMP Notes
1)It proper results are not got try the query in " (double quotes)
2) This file need xgoogle library found at http://www.catonmat.net/blog/python-library-for-google-search/

If --dir is not given it will download files into current directory.
If the script is stopped inbetween you can continue from the last result number by using --cnt result_number

This time I am have become a good boy and also added a status printing which shows how much percentage of current file is downlaoded.

grsrchDwn.py can be downloaded HERE

Let me know any comments.

Monday, December 5, 2011

Python script to check valid email addresses

We were having discussion about checking a list of email addresses for validity.
one of member had posted a bash script for Linux to verify the email addresses before sending the emails.

I thought to write a python script for the same in windows. Well this script can be easily ported to linux with just one or two lines changed. But I was too tired after all day office work to write check for OS and write windows as well as linux code. Currently it is only for gmail domain. But can be easily ported to every domain. Just need to extract domain from email id and check its MX by the existing code. (I told you already I am tired to write more code)
If some people found this useful and need sophisticated version then I would release a next version of program.

This python code take one argument which is list of emails one per line in text format.

You can download python file HERE

Thursday, December 1, 2011

Control PC through TV Remote Control

Recently I attached a LCD screen to my PC to watch Movies.

While watching movies I came across the fact that I was only able to adjust Volume, Color, Contrast, etc. TV features only.

Whenever I had to play/pause the movie or control media player I had to go towards the PC keybord / mouse. I found it very irritating. Then I thought why not use the Teensy (I had got some days ago) to code something using Infra Red Receiver. So I went to my favorite electronics shop and inquired for Infra Red components. I got one IR LED and one IR Receiver (TSOP1738)
TSOP1738 Manual Here

IR Reciver Pinout:


Surprising to me this Receiver was very cheap (converted to US$ 0.40$), when I checked some circuit ideas online only this IR receiver + Teensy was needed in the circuit.

The Teensy Pinout for Arduino is as shown bellow


The circuit is so simple. Just connected GND to GND Pin of Teensy and Vs to +5v pin of Teensy.
Pardon me for such rough circuit diagram but , I didnt thought I should waste more time in circuit diagram of so simple circuit. If any one has some doubts drop me a comment and I would provide answer to queries.

Rough Circuit Diagram


After that there I used a sample program that comes with IR Library with little but modification to blink built in LED on the Teensy Bord. This Infrared dump program can be find HERE
Then I pressed buttons of Remote and Noted down the Code received by IR Circuit.

Then I wrote a new program that can control the Media Player Classic which I use to watch movies. I coded shortcut keys used by Media Player Classic in my program and executed them when received the particular code of the Remote Key.

Then I remember reading somewhere that Teensy can also move mouse. So I went ahead and mapped the Remote Directional keys to mouse. I used Mouse.move(x,y) function and mapped 4 movements of mouse to the four directional keys found on my Remote.

So the is TV remote used to control Media Player Classic and also Mouse Movement on PC.

My Code can downloaded HERE

Photo of my Circuit looks like bellow


Tuesday, September 20, 2011

Automate irritating ISP login

Well recently my ISP updated their systems and made compulsory web login before giving access to any other site. I found this very frustrating and didnt liked it. Every time I start my modem I have to login to this ISP web login form.
So I just think to automate this process, I wrote a small python script to automate this login process. So as per my convenience I can put it in auto-run after login or whatever I want. Since I am lazy programmer I searched for a library which gave me easy manipulation of web forms. So I found mechanize module for python doing things which were necessary for this script. (Dont ask me why python , I dont want to start unother python Vs xyz Language fight. I like python very much so python :-) )

For easy usage of script I will briefly describe 5 parameters which are needed to be set one time before using this script.

loginURL = "http://login.example.com" # URL to Login form of ISP site

Here you have to put URL of the login page where the login form is shown

loginID = "myUserName" # ISP user name
loginPassword = "mYp4ssw0rd" # ISP Password

Quiet self explanatory : Username and password

loginFormName = "loginForm"

On the login page of the ISP site, check the html code for
tag put the name of the form in this location


successString = """NOW ACTIVATING YOUR SERVICES"""

Do a manual login and check the first page shown after login and copy any string from that page which is shown every time you login. This is used to check whether the login was successfull.

Comments are welcome.

Download script here
PythonScript ISPlogin.py

Monday, September 12, 2011

SL4A:The Scripting Layer for Android

SL4A enables it to support many scripting language
interpreters. In order to make practical use of SL4A, we will need atleast
the rudiments of one high-level scripting language such as Python, Ruby, Perl, Lua,
JavaScript, or BeanShell.

For me it meant ability to create and run python scripts on my phone without having to ROOT the phone. It makes possible to use lots of GUI like Checkboxes, Radio buttons, Inputbox very easily. I checked out some sample scripts and they were small and simple scripts just like normal python.

For ex. only 4 lines code was able to speak time using text-to-speech engine. Mind it two lines of them were import statements :D

import android
import time

droid = android.Android()
droid.ttsSpeak(time.strftime("%_I %M %p on %A, %B %_e, %Y "))


I found out about python scripting on android after months of buying the android phone :D
I feel ashamed of myself for not finding out this long ago. Well there were some battery problems with phone so had to give it back to service center two times. But it feels great now.

Better than that it allows directly creating & editing the scripts directly on phone also :-D

So I would be starting some scripting on python. If done anything interesting I will post it.